
A manual document is reasonable for an occasional pair. A repeatable report workflow becomes useful when you have several visits or many captions to keep together.
How to Make a Before-and-After Photo Report
Choose matching views, label Before and After, write useful captions and inspect the PDF. Follow the actual ReportMason workflow and download the two-page example.
Intent: Make a readable record of a repair or maintenance visit from the photos you already have.
Quick answer
Start a report with the job details, choose photos that show the same area before and after the work, label each stage and add a short caption. Preview every PDF page before exporting. In ReportMason, the tested path was New report → Photo Report → Add → Photo library → Photo details → Preview → Export.
- Use a similar viewpoint and enough context to identify the same area.
- Describe visible changes and facts you know. Do not invent a completion time, inspection result or client approval.
- Read photo date labels carefully. Imported time is not the original capture time.
In this guide
Fit check
Use this workflow when
- You have a starting-condition photo and a result photo that a client needs to understand together.
- You make similar reports regularly and want project details, stages and captions in one PDF workflow.
Not ideal when
- You only need to send one simple photo pair; a document you already use may be sufficient.
- Your task requires a shared project database or a formal inspection process that a photo report alone cannot supply.
Decision rule: If the two views do not show the same area clearly, explain the difference in the caption or choose a better pair. A stage label cannot make an unclear comparison meaningful.
Step-by-step workflow
- Create the report. Tap New report, keep Photo Report selected, enter the title, client, site and date, then tap Create report. Use the actual visit date for your own job. Our demonstration uses its assembly date and says so in the notes.
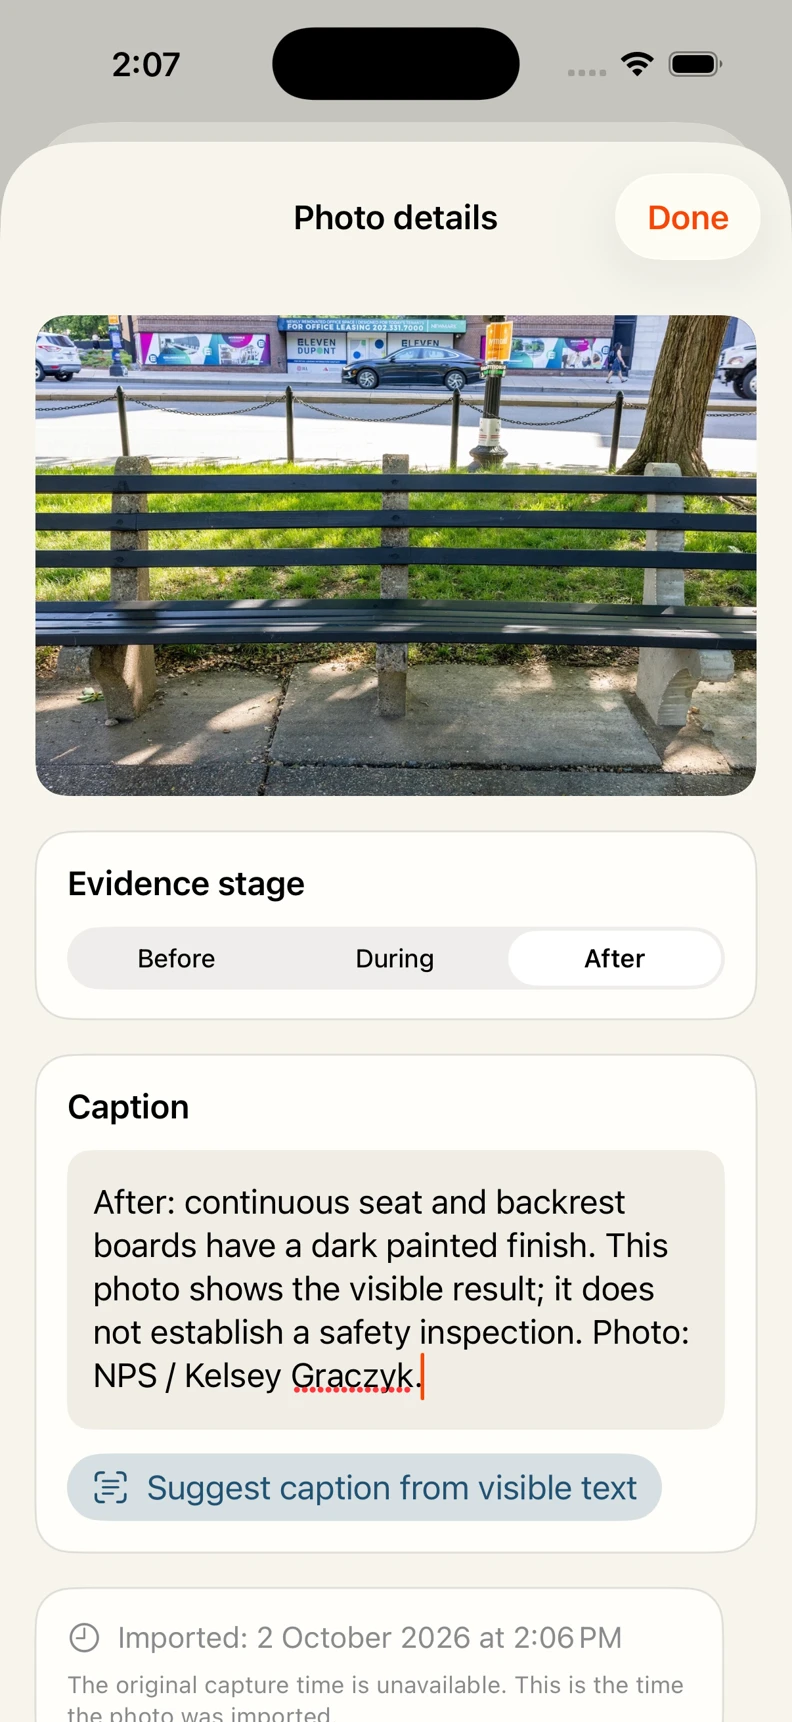
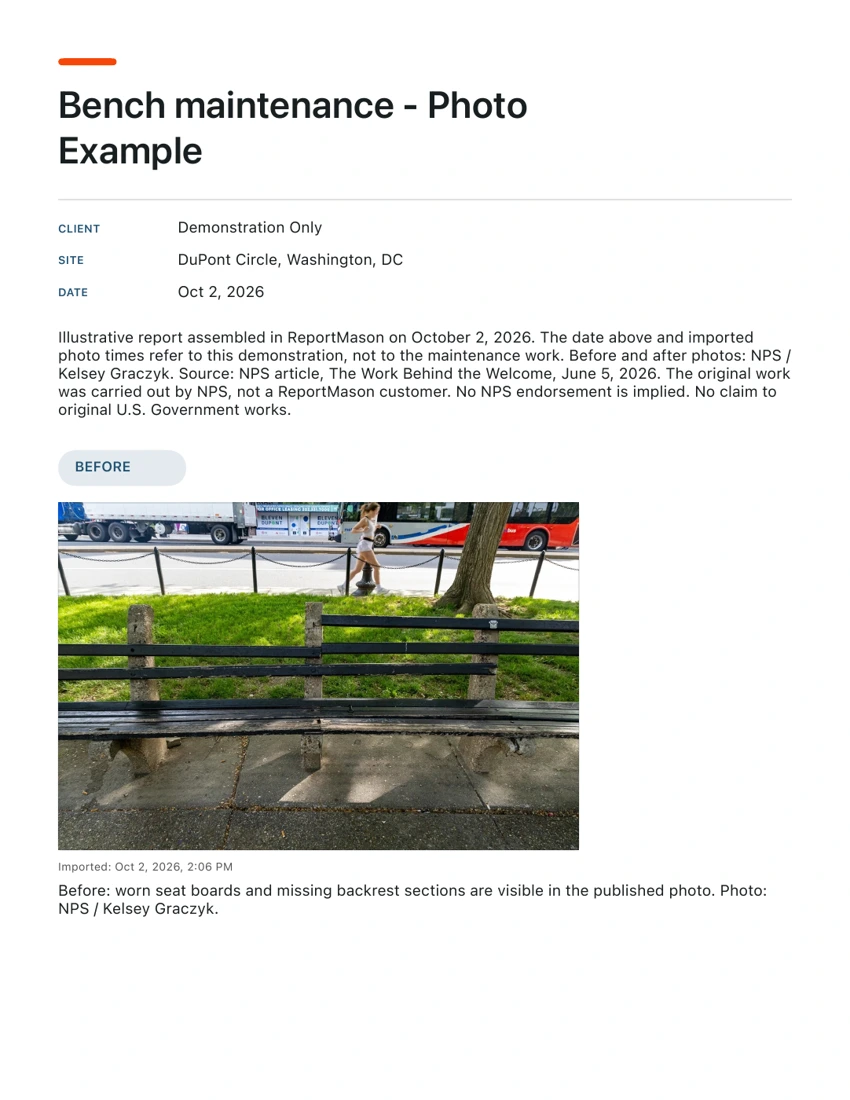
- Choose the comparison. Tap Add → Photo library → Choose photos, select the relevant images and confirm. Pick a similar viewpoint for both stages. In our bench example, the tree and concrete supports help identify the area despite small differences in angle and background.
- Label and explain each photo. Tap its card, choose Before or After under Evidence stage and write a caption. For example, the Before photo shows worn seat boards and missing backrest sections; the After photo shows continuous boards with a dark finish. Save with Done. Use During only when you have a useful in-progress photo.
- Preview the full report. Tap Preview and read every page, including notes, stage headings, captions and time labels. In this example, the photos say Imported because capture time is unavailable. A missing checklist or signature is better than an invented one.
- Export the checked copy. Use the export control in the PDF preview or Export PDF in the editor. Choose a destination in the iOS share sheet. Reopen the saved PDF and check that both stages and their captions are present before sending it to the client.
Audience: People documenting repairs and maintenance · Difficulty: beginner
Example and checks
What we checked
Checked · iPhone 17 Pro simulator, iOS 26.5 · ReportMason 1.1.0 (6)
Created a fresh Photo Report through the UI, imported two credited NPS photos, wrote captions, set Before and After, previewed and exported through the normal free path. Both PDF pages were rendered and visually inspected; complete captions and source notes were retained.
Limits of this check
- Local source build; a signed App Store installation and physical device were not tested.
- Camera capture, iPad, signature, location, purchase and restore were not exercised.
- Demonstration date and Imported photo times describe report assembly, not NPS maintenance work. No NPS endorsement is implied. No claim to original U.S. Government works.
Common mistakes
- Pairing different areas without explaining what the viewer is looking at.
- Writing “job complete” when the photo only establishes a visible change.
- Treating the imported timestamp as proof of when the work or photography happened.
- Sending a photo from the library when you intended to send the checked report PDF.
Tradeoffs
Longer notes add context but can change pagination. Judge the complete PDF, not just the first page.
ReportMason creates the PDF locally. Installing the app, billing and sending to a chosen online destination can still need a connection.
Recommended app for this workflow
ReportMason lets you keep job details, selected photos, stage labels and captions together, then preview and export a PDF on your device. The sample uses a basic Photo Report with two photos and no checklist or signature.
FAQ
Do I need Before, During and After photos?
No. Include the stages you actually recorded. This sample contains Before and After only. An in-progress photo helps when it explains work that will no longer be visible afterward.
How should I caption a before-and-after pair?
Name the area and describe the visible condition or change. Add a measurement or action only if you recorded it. Use the caption to explain differences in viewpoint, lighting or coverage.
Does the photo time prove when the work happened?
No. In this sample the source inputs have no capture timestamp, so ReportMason labels the time Imported. Explain which date refers to the visit and which refers to preparing the report.
Can I try the workflow for free?
The app is free to download, and PDF previewing does not use an export. Free PDF exports have a limited allowance shown in the app. Optional one-time Lifetime Pro adds unlimited PDF exports.